As an Amazon Associate, I earn from qualifying purchases.

Most schools, offices, and a good number of homes have pouch laminators. These laminators are handy for preserving important documents or creating signs.
But over time, it can cause bubbles under the pouch. These bubbles not only badly impact the aesthetics but also cause the document to deteriorate faster.
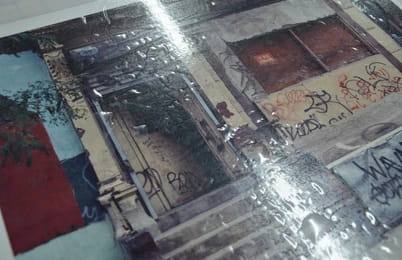
Bubbles under the pouch
Laminators generally cause bubbles. That is why “how to fix laminator roller that cause bubbles” is one of the most common questions for laminator users. Today I will help you solve this issue
Table of Contents
4 Common Reasons Why Laminator Roller Causes Bubbles?
Bubbles are one of the most popular problems when using a laminator roller. Bubbling can appear for plenty of reasons, and here are the top 4 most common ones.
Tension
Not enough roll tension supply can cause bubbles. When air is trapped between the film and the image, insufficient tension can cause air bubbles. If the tension of the feed roller is too small, bubbles will be generated and the film will wrinkle.

Reduce tension can stop bubbling
Speed
If the article is pushed into the nib faster than the laminator roller, then feeding too fast can cause air bubbles.
Heat
When inkjet printers pour too much ink on the print output, the operator rushes to laminate the picture while the ink hasn’t completely dried. If the laminating machine is left still for long periods without the roll spinning, alternate parts of the roll may have different temperatures.

Too hot temperature can causes bubbles
These different temperatures create “heatspots”. When the laminator is running at about 85 degrees, the place where the laminator roller can turn into a “heatspot” with temperatures up to 95°C. When a damp inkjet print encounters one of these hotspots, the ink can easily bleed, boil, and create bubbles.
Silvering
Silvering is born by the trapping of tiny air bubbles, they usually look like reflective areas in the laminate. Silvering is often more visible over dark and black areas than light ones.
The appearance of silvering is usually due to low operating and film temperature or not enough time for the laminator roller to heat up. Unsuitable temperature leads to “cool spots”, areas where the laminator roller temperature is not high enough to liquefy the adhesive.
How To Fix Laminator Roller In 6 Easy Steps
Normally, bubbles indicate that the laminator roller may need to be cleaned or changed. If the roller cannot pull the film sufficiently to prevent bubbles, you may also need to modify the roller pressure.
Wiping the roller and modifying the pressure are two good steps to start your strategic maintenance. Below are 6 steps for you to fix the bubbles problem.
Step 1: Look for the reason
Before trying anything, you should look for the cause of the problem.

Thinking about the reasons first is essential
For the 4 common causes that I mentioned above, recognizing these problems without disassembling the machine is quite simple.
You need to pay a little more attention while using the machine, especially to the tension and the temperature of the roller. Don’t forget to have a suitable speed and good timing.
Step 2: Take off the housings
But unfortunately, sometimes the problem is not as easy to handle as we would like, this is when we need to dig deeper. Remember to turn off and unplug the machine to prevent the motor from burning out. It would be best if you wait for the machine to cool down before having another attempt.
Then remove both left and right housings. Be careful not to damage anything, especially the roller.
Step 3: Cleaning The Roller
Removing dirt on the rollers with a clean, soft cloth. It will help if you dip this cloth in either a cleaning solution provided in the cleaning kit or isopropyl alcohol. Wipe it gently, you don’t want to buy a new roller for hundreds of dollars!
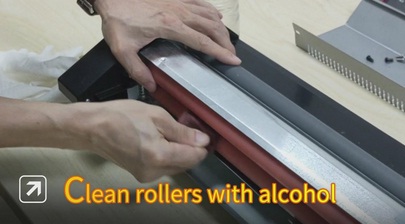
Clean the roller gently
Step 4: Change the pressure
You can try to raise the pressure adjustment screws to raise the roller pressure or lower them to reduce it. Remember to increase or decrease these adjustment screws on two sides evenly. You only adjust one side when the pressure on the left side doesn’t match the right one.
Step 5: Check inside
Check the screws and pulleys, re-tighten ones that are loose. Screws and pulleys can also be why laminator roller are not working properly.
If the roller and motor still do not rotate normally, remove the side panel and find the pulley base where the pulleys and screws are. Keep trying to tighten them.
Step 6: Reassemble the housings
After checking all possible problems, completing all the above steps, assembling the disassembled parts, always do it gently to avoid causing unnecessary problems.
Remember to plug it in and run it again to see if the laminator roller’s problems have been completely fixed and the bubbles still appear.
Conclusion
Laminating isn’t complicated, in fact, it is designed so that anyone can use it. But bubbles can be caused for many reasons, so knowing how to fix laminator roller should be essential. Thanks for reading our article, and we hope our insights have helped you easily determine your problems and the solutions to them! Have a good day!


